

When I am creating TCL scripts for GEOVIA Surpac users, I want to provide them with the ability to make multiple selections of data. However, without knowing how many items the user will input, controlling the flow of the macro can be a challenge.
This topic covers TCL and SCL/GUIDO concepts and assumes some prior knowledge of their basic use, but the completed macro’s text will also be included at the end for you as a guide and reference. As an exercise for this post, we will create a form which has a table that allows us to select some block model attributes.
Note that this is suitable for Surpac users who are interested in TCL scripting, but it is an advanced topic.
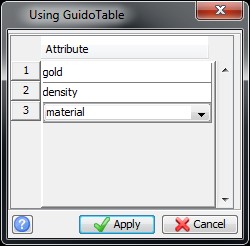
First, open the GuidoTable window.
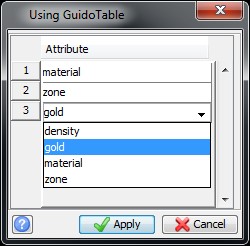
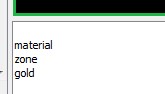
Click Apply. The macro will simply write the selected attributes to the output window.
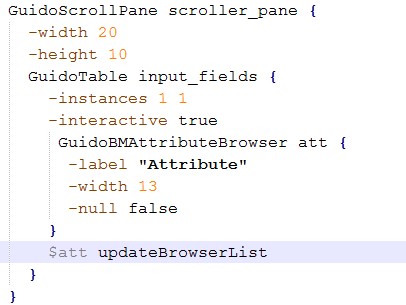
Setting up the GuidoTable
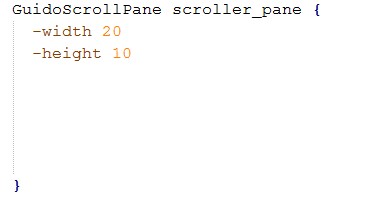
Typically, I put the table inside of a scroll pane, so that I can control the dimensions of the table inside of the GuidoForm. This also helps the user view the entire table as inputs can easily grow past the extents of the form and this will allow the user to navigate up and down the list.
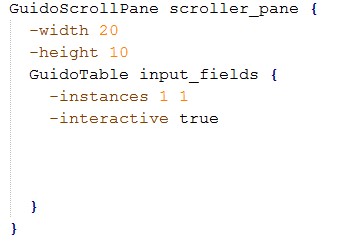
Next, setup the GuidoTable inside of the scroll pane.
There are several switches available for the table, but the most important to us here is the instances and interactive switches. The interactive switch will let users add and remove rows in the table as they see necessary and instances will allow you to have control over the number of rows input into the table and follows the syntax:
instances [initial] [minimum] [maximum]
Note that:
- [initial] determines the number of rows to initial be created in the table
- [minimum] is optional and determines the minimum number of rows that are allowed in the table
- [maximum] is also optional and determines the maximum number of rows that are allowed in the table
- In this example, I am initially setting the table to one row, and ensuring that at least one row exists in the table when the form is applied.
Finally I will introduce the individual fields I would like to add to the table as columns inside the GuidoTable. For the exercise today I will simply add one block model attribute browser field called att.
The completed GuidoForm should look like this:
Using the table’s inputs in the script
Unlike a regular field setup in a GuidoForm, which stores the inputs to a simple variable when the fields are part of a GuidoTable, they are stored as an array, which is a container of multiple variables.
The array uses a two component naming structure to store individual values and follows the syntax array_name(key). For this exercise I chose to only add one column to the table, a block model attribute browser field called att and the guido table will create the keys as integers starting the count from zero.
Thus, to use the variables input into the table you simply need to indicate which row you’re interested in by specifying the key.
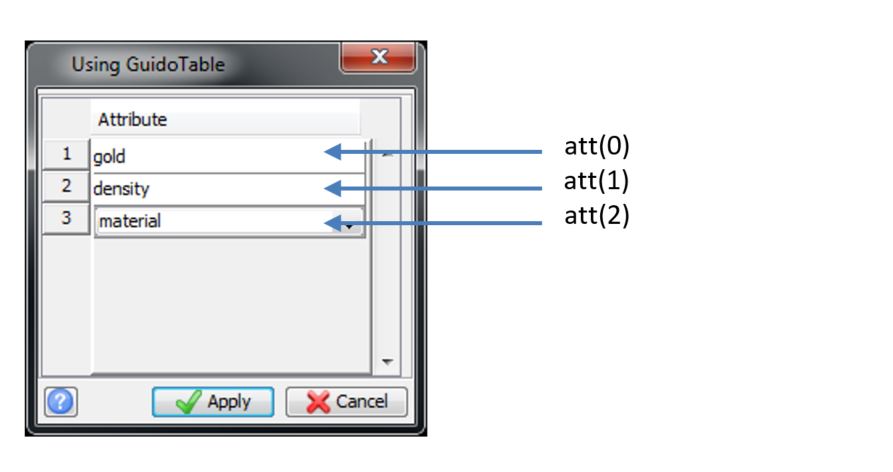
Armed with the knowledge that the key is incremented from zero, it is easy to handle control flow by using a for loop to cycle through all of the values from the table.

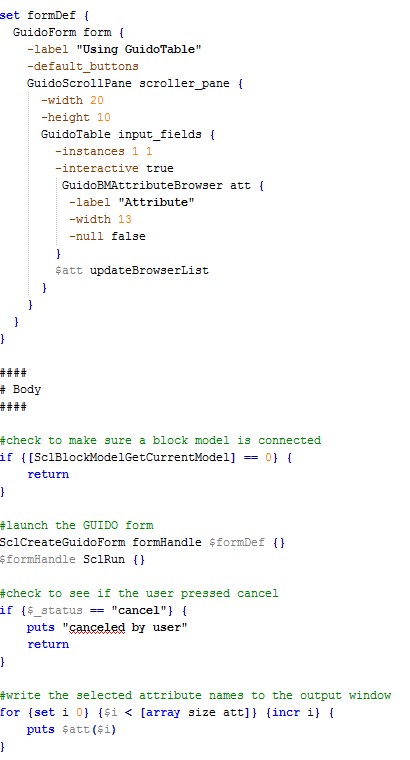
Here is the complete text for the macro I created for this exercise:
For more on TCL scripting, check out: