Like with any vehicle, safety is extremely important when designing bicycles. The construction must be sturdy enough to support the weight of the rider while still remaining streamlined and lightweight enough to travel at a rapid speed. This three-part video series available on the SIMULIA Community shows how the 3DEXPERIENCE platform can be used to model a bicycle frame with Automated FEM.
In the first video, we show automated meshing on a bicycle frame. As with many fabrications, whether they be sheetmetal or tubular sections such as this bicycle, shell elements are an efficient representation of the model. However, just midsurfacing the components will leave gaps between them. In this analysis, model line fasteners are used to connect the separate shell meshes together. As we will see, both of these approaches can be automated to quickly build the full model.
In the second video, we will show that for the analysis model of this bicycle frame we will use line fasteners to model these welds. The full assembly has a skeleton component, which is ignored; for all of the other components, a rule-based midsurface quad mesh procedure is used. A shell section is created for these components, and the same procedure is implemented for the remaining unspecified components. Clicking “Run” automatically processes all of the components, generates any midsurfaces needed, and generates the shell or the mesh, along with the appropriate section properties.

With the midsurfacing of the tubes, however, disconnected meshes and gaps still exist between the tubes. In a real bicycle, the tubes would be connected by welds; in the model, line fasteners are used to model the welds. The model now shows a geometric set called seam welds. This set is an extract of the edges of the ends of the tubes. If it were being done manually for each weld, the edge could be selected interactively as the connection is built. For the automated process, however, there needs to be some way to identify which locations to choose.
In the Structural Model Creation app, the Connections tab contains the Line Fastener Detection tool. This tool will try to search all the 3D part bodies. However, the model already uses 3D shapes and midsurfaces, so everything included in the process has already been meshed. Instead, the Meshed Supports tool should be selected. Then, it is necessary to identify where the line fastener should be placed on the meshed supports, using an information dialogue of the model.
So, how should the line fastener be modeled? One of the key choices is what type of elements to use to fill the gap. In this case, shell elements are used since they are consistent with the tubes. A width needs to be specified for the weld elements; with the chosen inputs, Find Supports will scan the model and show which connections it will make. In this case, 12 line fasteners can be created. Moving forward, the coupling is shown at each connection in the model.
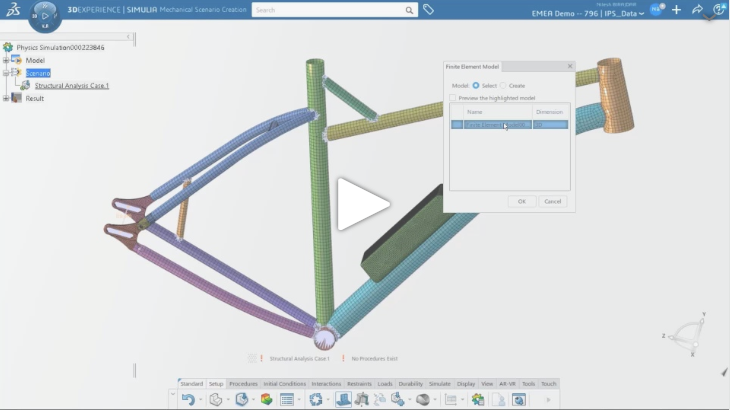
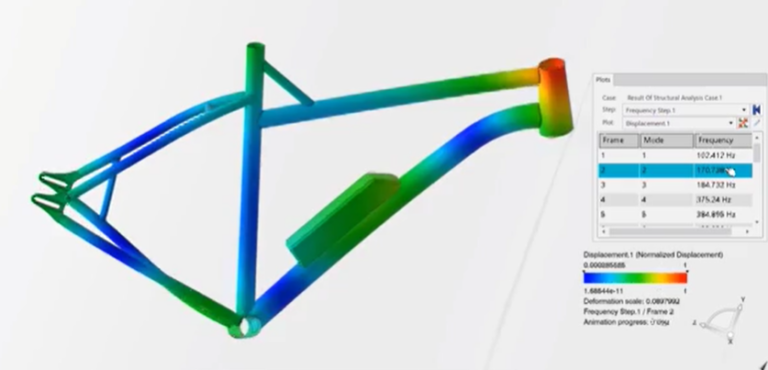
Finally, in the last video a modal analysis is set up in the Mechanical Scenario Creation app. The first choice to make is what type of analysis to run – in this case, it will be structural only. In 3DEXPERIENCE, a model can contain multiple representations – this is different from Abaqus/CAE. As well as geometry representations, there can be multiple finite element model representations.
For the modal analysis, a frequency step is implemented, followed by the simulation step. Since the cloud version of 3DEXPERIENCE is being used, the choice can be made to solve either locally or on the cloud hardware. After solving, we can see the displacement animation for the bicycle frame.
For further details about the process, please watch the three-part video series here.

SIMULIA offers an advanced simulation product portfolio, including Abaqus, Isight, fe-safe, Tosca, Simpoe-Mold, SIMPACK, CST Studio Suite, XFlow, PowerFLOW and more. The SIMULIA Community is the place to find the latest resources for SIMULIA software and to collaborate with other users. The key that unlocks the door of innovative thinking and knowledge building, the SIMULIA Community provides you with the tools you need to expand your knowledge, whenever and wherever.

Katie is the Editor of the SIMULIA blog, an expert in engineering and scientific communication, and a strategic digital marketer. Katie has a BA in English and Writing from the University of Rhode Island and a MS in Technical Communication from Northeastern University. She is also a proud SIMULIA advocate, passionate about democratizing simulation for all audiences. Katie is a native Rhode Islander who lives just outside of her favorite city, Providence. She is a true New Englander and loves sharing all the cool things NE has to offer. She enjoys a variety of hobbies including history, astronomy, science/technology, science fiction, true crime, fashion and anything associated with nature and the outdoors. She is also mom to a 6-year old budding engineer and two crazy rescue pups.