
When using GEOVIA Minex™, you might be required to do repetitive tasks every day, every week, or every month (updating the borehole database, plot sections, or report reserves). How easy would it be if you could complete this with just a few clicks of the mouse? Well, sit back and relax and let Minex do the tasks for you. Minex supports Tcl and Tk to automate tasks. After you have created the scripts, (or had them created by GEOVIA), run them repeatedly to perform repetitive tasks at a single click. Tk can be used to create a user interface, which runs on top of Minex.
Here is an example of a Tk graphical user interface (GUI). This specific script automates the process of updating the borehole database as soon as new holes are drilled, and is also capable of updating the model using the new borehole data.

These forms can be designed and created as required by the user. The input from these forms is passed to Tcl/Tk scripts, which can run Minex tasks for specific jobs. To learn more about Minex tasks, try recording a task and replaying it.
Here are the steps to record a macro, which will rotate the graphics window slowly about the current center of rotation.
1. Press  to start/end recording a Tcl script. The macro Save form is displayed. Tip: You can also start recording a script by choosing Tools > Scripting > Start/stop recording a script
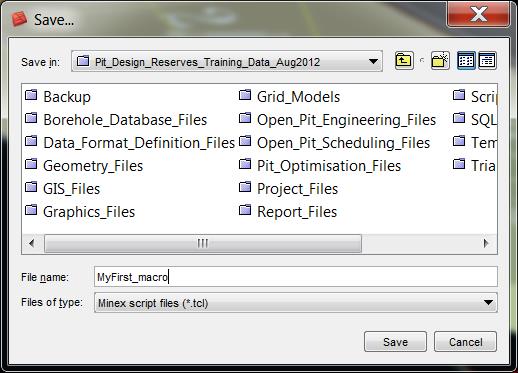
2. Type the name that you want to use for the macro, and click Apply. By convention, Tcl scripts are stored in the Script_Files folder of organized projects.
3. Perform the tasks you want to record. In this case, click on the menu Graphics → 3D Navigation and move the slider at the bottom to the right. Any object(s) that are in the current graphics window will start rotating. Click Stop when you want to.
4. Press to start/end recording a Tcl script. Note: you can also stop recording from the Tools → Scripting menu.
5. While the macro is running, you will see the Stop icon glow. The start button will also now become a STOP button. 
Playing Back a Macro
There are several ways to activate a macro in Minex.
1. When a macro is running, a prompt appears in the output window as: “Running macro ..<path><macro_name>.tcl”
2. If the User Scripts folder has been specified and the macro resides in this folder, then the macro can be activated by clicking on the corresponding icon in the toolbar.
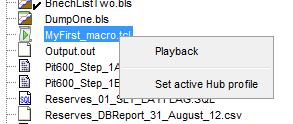
3. When the Macro Playback icon is clicked ![]() , Minex asks for the name of the macro to be played. Once selected the macro is run. Another way to select the macro is to right-click the name in the Explorer window and select playback, as shown here. Double-clicking the name of the macro also works.
, Minex asks for the name of the macro to be played. Once selected the macro is run. Another way to select the macro is to right-click the name in the Explorer window and select playback, as shown here. Double-clicking the name of the macro also works.
When a Tk macro runs in Minex, it locks the user interface. Until the Tk window is closed, Minex remains inactive. An example of a Tk macro is the Minex Pit Optimizer input interface.
Minex can record all attributes of the user inputs provided or may record only the changes. This depends on the user’s choice. This setting can be changed by selecting Tools → Options → Scripts.
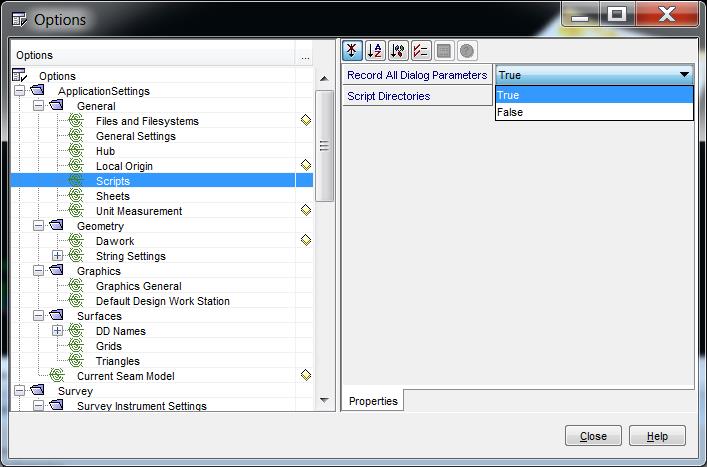
Select “True” to choose all parameters in the forms to be recorded, even there has not been any changes made. Select “False” to record only those parameters, which have changed. The recorded macro can be edited using any text editor. Add other Tcl commands to repeat tasks, or make it intelligent to further decide based on your inputs. You can also create an icon or a menu item to run macros. Contact GEOVIA support for details on how to accomplish this.
The “Updating a Geological Model” macro discussed in this post can be configured to suit your requirements. Some key features of this macro are:
- Each major step has been put into a separate tab
- Enter and validate borehole data, and create histograms and statistical reports
- Create Father Son or Ply Split relationships, and view a schematic diagram of splits
- Select boreholes from a file or by Type
- Perform Multi Seam Multi Variable gridding
- Create cut and merged models
- Report detailed resources and create cross-sections
- A detailed user manual is included
Please contact GEOVIA for customization of this macro or for any other automation requirements.
Looking for more Minex Tips & Tricks? Check out some of my earlier posts to learn about Plotting Plans & Sections in Minex and Creating 3D Views of Surface Infrastructure in Minex.
Be sure to check back next week for more Product Tips & Tricks!

Ranajit is a qualified Mining Engineer with over 22 years of experience in mine planning, consulting, operations, logistics, exploration and feasibility studies. Ranajit has previously worked for the Steel Authority of India, Santa Fe Mining in Chile and JSW Steel in India. He specializes in GEOVIA Minex and Surpac.