
The Digitiser Drafting mode has been a great and much-used feature of GEOVIA Surpac for a number of years. The release of Surpac 6.6 saw some new improvements that make it work even better.
The Drafting Tool provides graduated snap controls for the angle and distance from the current digitiser point to ensure the next digitiser point is created at an exact distance and angle away. Here is an example of using Drafting mode in plan view to create an exact square – a rectangle is just as easy. Follow these steps:

- Load a file and ensure Surpac is in plan view by using the ZOOM ALL command
- Start digitising by pressing the “Create new points using the mouse” button
- Create a new point at any convenient location, make sure you use Plane snap mode.
- Right click the mouse button and select Drafting mode from the context menu.
- Check the tool properties panel to make sure the angle and distance snap settings suit your needs. The specified values cause the new points to be located at increments of the angle, distance and offset (for Edge follow mode) values. *Note that these values can only be changed when Drafting mode has been selected.

- Note how Drafting mode provides helpful feedback in the graphics window of the angle and distance values to the new point. Press the left mouse button when the angle and distance values are exactly as you want to create a point at the desired location. Repeating this appropriately for 3 new points then close the digitiser segment by pressing the 0 (zero) shortcut key to create a square.

Creating a square using Drafting mode.
Here are a few other useful tips about drafting mode:
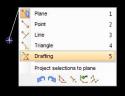
Keyboard shortcuts on the popup menu
Note the numbers on the right of the digitiser popup menu. These are keyboard shortcuts to save you from even having to display the context menu to change the snap mode. The numbers 1 through 5 allow you to change snap mode, with “5” being a special case to enable Drafting mode.
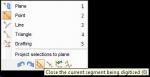
There are keyboard shortcuts for the buttons across the bottom of the digitiser context menu. These are shown using a tooltip when the mouse hovers over a button for a brief period. The keyboard shortcut is shown in parentheses at the end of the tooltip text. The keyboard shortcuts for these items are:
- Ctrl+Z for undo.
- Ctrl + Y for redo.
- 0 (the zero key) to close the current digitiser segment.
- – to end digitising the current digitising segment. The next digitised point will be the start of a new segment.
- + to increment the string number of the digitised points. This also causes a new segment to be started for the next digitised point.
- / to ensure the next digitised point is exactly halfway between two selected points. You are prompted with “Select the first point with the mouse” and “Select the second point with the mouse” to select the points of interest. *Note that you have to press Escape cancel digitising when in this mode.
The default values for Angle snap, Distance snap and Offset snap can be defined in the Tool settings of the Customise → Default preferences form. Other useful default preferences are:
- The angle offset reference axis – this is sometimes helpful when digitising the first point of a segment.
- Colours for the reference lines/arcs and the text font size.
Drafting mode works even on vertical and inclined planes making it easy to create exact shapes no matter what the orientation of the view.
If you set any of the snap parameter values to zero, it’s as if that snap control has been disabled
We hope these Tips and Tricks help you when using the Digitiser Drafting Mode.
When mining companies seek to increase mine productivity, they turn to Dassault Systèmes for technology and services. It is home to world-renowned and award-winning mining solutions and to industry thought leaders who are pushing the boundaries of what’s possible in mining, through the GEOVIA brand. The largest global supplier of mining software, GEOVIA delivers comprehensive solutions in all major mining centers in more than 130 countries at over 4,000 sites.