
On some occasions, we have a significantly large block model size but we are only interested in a portion of the entire block extents, or a few among the many attributes. Although we can constrain the model graphically, it does not really reduce the file size of the block model. Reducing the size could significantly speed up any processing done to the block model.
There are many ways to reduce your block model size but in this particular article, we will learn one of the methods available:
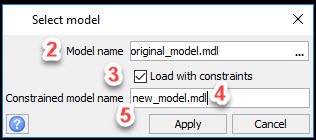
- Go to BLOCK MODEL > BLOCK MODEL > NEW/OPEN
- Choose the original block model you want to resize
- Tick the “Load with constraints” box on
- Nominate a constrained model name
- Click APPLY
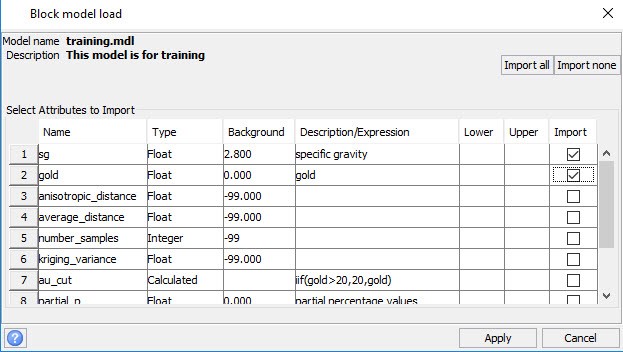
6. Choose the attributes that you want to carry through to the new model and click APPLY.
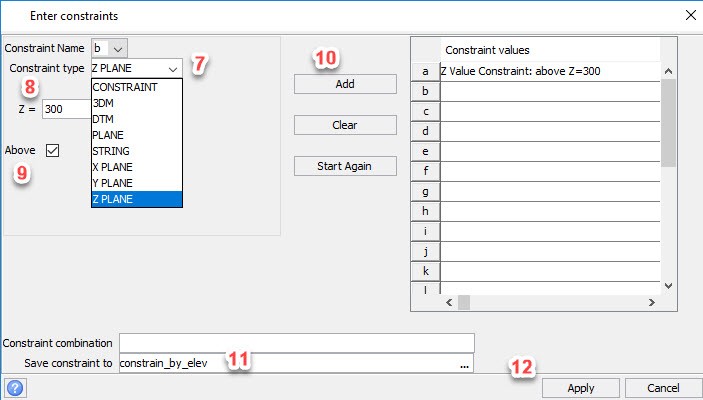
7. Choose how you want to constrain the block model. There are many constraint types types as shown on the picture below but to for this particular example we are interested to reduce the depth of the block model, thus we will use constrain by z-plane.
8. Nominate the maximum depth
9. Tick “Above” box
10. Click on “Add” to nominate this constraint set-up
11. You may opt to save this constraint set-up to re-use next time, if so nominate a constraint file name.
12. Click APPLY
NOTE: The new block model is created and opened but not automatically saved so remember to save


Technical Customer Support Consultant – Mining | Marck is a Mining Engineer with more than 3 years of experience in Mining Operations and also more than 3 years of experience as a software consultant for GEOVIA Surpac, Minesched, and Whittle. He spent most of his practical time in underground block cave mining for copper and gold and he is highly experienced in short term planning. Since joining GEOVIA in 2017, Marck has leveraged his mining knowledge while helping improve GEOVIA user base experience.